HOW TO INSTALL HANDISWAGE™ CABLE RAILING
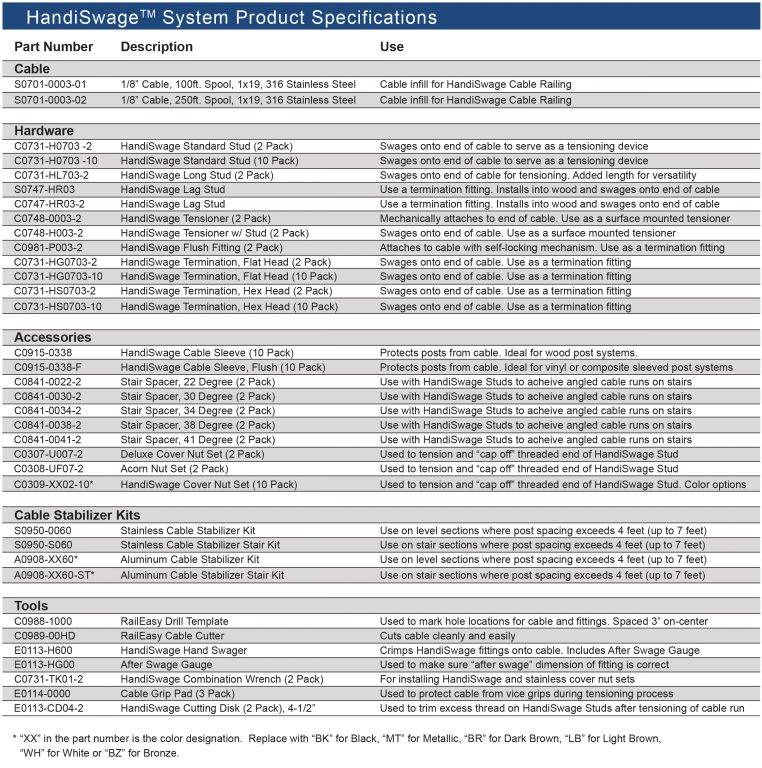
The HandiSwage™ System is an easy to use cable railing product utilizing fittings that are an adaptation of traditional swage fittings. They can be attached to cable using our specific hand swage tools. HandiSwage™ combines the aesthetic appeal, durability and quality of RailEasy™ cable railing with the economy and convenience of 1/8” cable as well as 5/32″ cable. The following guide will take you step-by-step through the process of installing your HandiSwage™ cable system, offering helpful tips and tricks along the way.
Always refer to your local building code officials prior to installing any cable railing system to ensure all code and safety requirements are met. We are not responsible for improper or non-recommended installations.
Downloads

CABLE RAILING POST PLANNING AND INSTALLATION
You will be working with three types of posts; end posts, used at each starting or ending point, corner posts, used at every change of direction, and mid posts, used to support rails and cable between end and corner posts.
CABLE RAILING END POSTS AND CORNER POSTS
The attachment of the post to the decking is extremely important. Check local code requirements. Most municipal building departments provide specific drawings and examples of preferred post attachment methods. Substantial end and corner post are always necessary to prevent the posts from bending under the cable tension. If post material is not strong enough to withstand tension, it may cause the post to bow and the cables to sag. A minimum 4×4 (3-1/2 ” square) post is required.
CABLE RAILING MID POST
Cable railing requires support (mid posts) every 4 feet to maintain cable spans with minimum deflection. If you wish to maintain 3″ spacing for cable sections that span over 4 feet (max. 7 feet), Atlantis Rail offers cable stabilizer kits. We have independent test results showing that the RailEasy™ Cable Railing System meets and exceeds the requirements of the International Building Code and International Residential Code at post spacing up to 4 feet. Any variance from our recommendations should be discussed with your building inspector before proceeding with a project. Post spacing over 4 feet is done at your own risk.
ADDING THE RAILS
A top rail is always necessary when building a cable railing system.
The top rail should always be installed in a way that allows the top rail to absorb and deflect the pressure applied when cable is tensioned. It is a best practice to secure the top rail between the posts rather than simply placing the rail on top of the posts.
Bottom rails add support to any railing system and it allows for a foot rest when leaning on the railing.
CABLE RAILING TOOLS FOR THE DO-IT-YOURSELF INSTALL
- Power Drill
- #2 Phillips Driver Bit
- 9/32″ Drill Bit
- 3/16″ Drill Bit
- 1/8″ Drill Bit
- 7/16″ Open Wrench
- 3/16″ Open Wrench
- Cable Cutter
- Hand Swage Tool
RECOMMENDED PRODUCTS
RailEasy™ Drilling Template
The RailEasy™ Drilling Template allows for an easy installation of a cable railing system.
After Swage Gauge
Use this gauge to confirm that the “after swage” dimension of each HandiSwage™ fitting is correct after using the hand swager tool.
Cable Grip Pad
Use a Cable Grip Pad with vice grips when tensioning the cable runs. This prevents damage during installation.
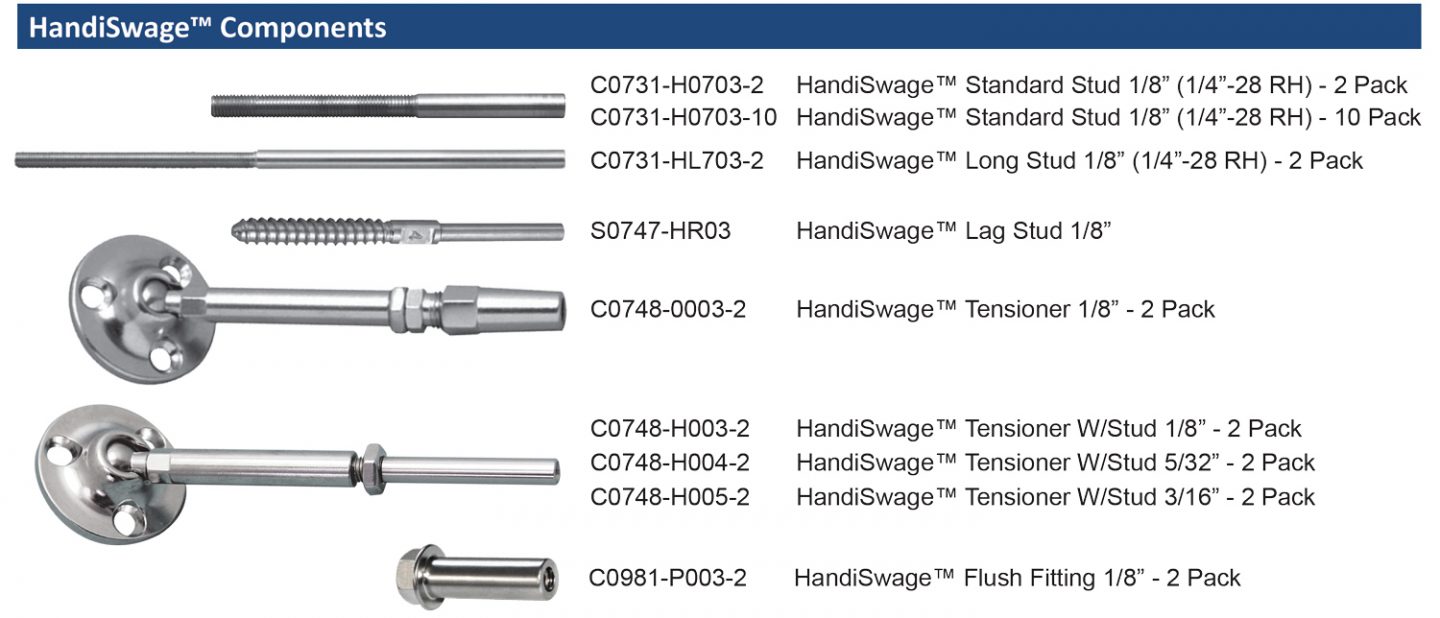
Additional Components
HandiSwage™ Flat Head Termination
The HandiSwage™ Flat Head Termination is a “fixed” termination fitting used for added clearance on gates in conjunction with a HandiSwage™ Stud on the opposing end.
HandiSwage™ Hex Head Termination
The HandiSwage™ Hex Head Termination is a “fixed” termination fitting used in conjunction with a HandiSwage™ Stud on the opposing end.
HandiSwage™ Cable Sleeve
The HandiSwage™ Cable Sleeve is designed to protect your wood posts from chafing and incidental damage.
HandiSwage™ Cable Sleeve Flush
The HandiSwage™ Cable Sleeve Flush is designed to protect your wood posts from chafing and incidental damage from cable rubbing around the outside of your mid post cable holes.
Stair Spacer
The Stair Spacer is ideal for stair applications where a “through post” fitting is being utilized to achieve an angled cable run.
Acorn Nut Set
The Acorn Nut is designed for use with HandiSwage™ swage studs and RailEasy™ Stud Assemblies.
Deluxe Cover Nut Set
Designed for use with the HandiSwage™ Studs and RailEasy™ Stud Assembly.
HandiSwage™ Cover Nut Sets
Designed for use with HandiSwage™ Studs and RailEasy™ Stud Assembly.
Stainless Steel Cable Stabilizer Kit
The Cable Stabilizer Kit is designed specifically for use where post to post measurement spans over 4′.
HandiSwage™ Combination Wrench Set
The HandiSwage™ Combination Wrench Set includes 2, 3/8” and 7/16” combination wrenches and is used to aid in the installation of HandiSwage™ and Deluxe Cover Nut Sets.
HandiSwage™ Cutting Disk
The HandiSwage™ Cutting Disk is a high performance abrasive cutting disk used to cut threads on HandiSwage™ studs after installation.
STRAIGHT SECTION- PREPARATION
The infill for the HandiSwage™ System is comprised of cable and a variety of fittings. The following section will show you how to install fittings on straight sections.
HANDISWAGE™ STUDS (C0731-H SERIES)
Measure & Mark Your Posts
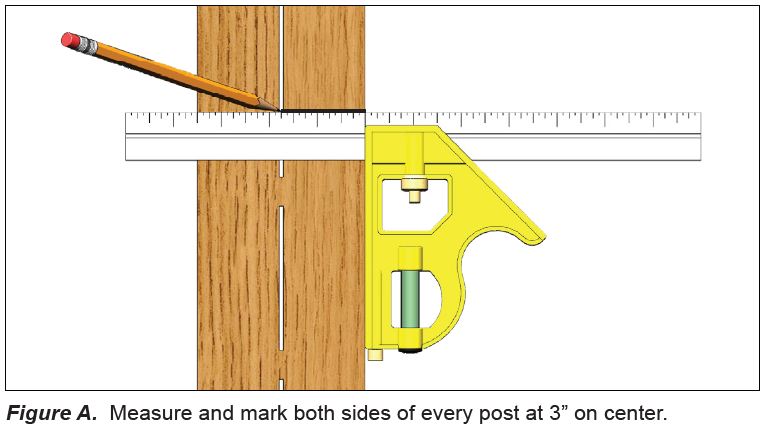
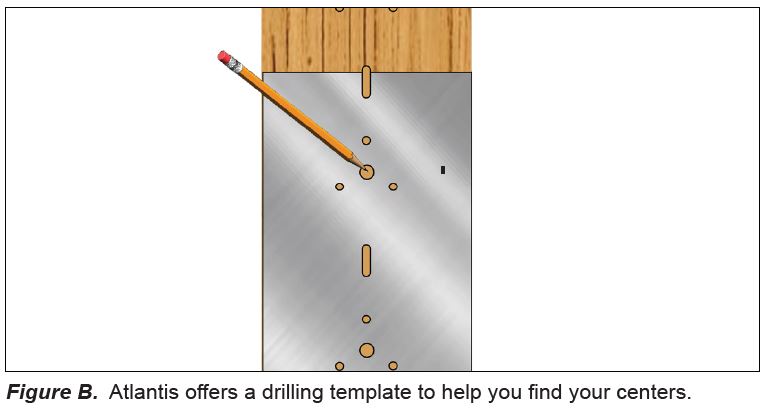
Determine the number of cable runs you will need to maintain code compliance. Atlantis Rail offers a handy drilling template that is spaced at 3” to help you locate your centers.
Find the center of the post face and draw a vertical line. Measure your spacing up from the mounting surface or top of your bottom rail to the underside of the top rail. Using a carpenter’s square, draw lines across the post face making sure they intersect with the center line you just drew (See Figures A & B). Repeat for both sides on every post.
For corners, you must offset your holes by 1/2” to avoid having the HandiSwage™ studs interfere with each other or cause a weakened post situation or double post (See Figure C).
Drill Your Posts
Using a 9/32” drill bit, drill straight through the end and corner posts. Drilling the posts from each side and attempting to meet them in the middle will help you hit your centers more accurately and will make for a neater installation. Be sure your drill is level and that the hole goes all the way through the post. The swage terminal should be able to pass completely through this hole.
FLUSH FITTING (C0981-P003-2)
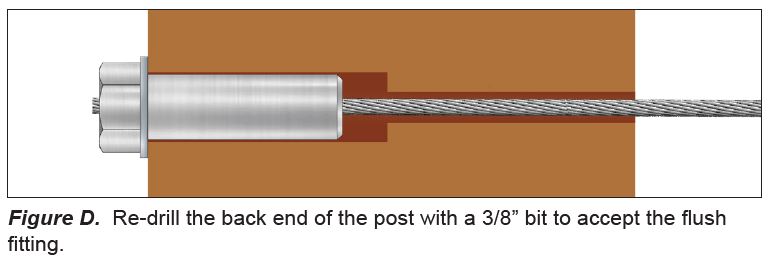
The flush fitting is designed to ease installation by eliminating the need for accurate measurement and swaging at one end of a cable run. You still use a HandiSwage™ terminal on the other end of the cable run. When using the flush fitting on one end you will re-drill the back end of the post (See Figure D) with a 3/8” bit approximately 1-1/4” deep to accept the flush fitting. See additional instructions below for running cable using the flush fitting. Cover nut sets are sold separately.
LAG STUD (S0747-HR03)
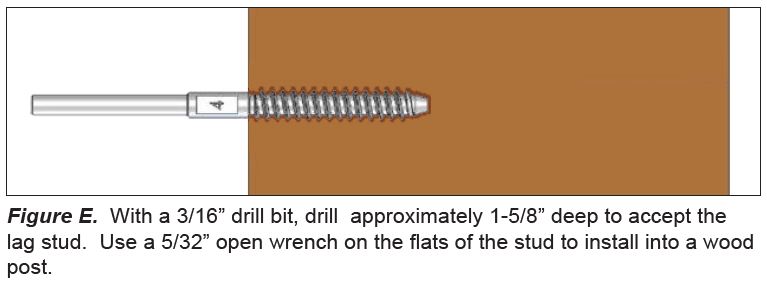
The lag stud is designed for use in short runs and must always be used with a tensioning device at the opposite end of the cable run. With a 3/16” drill bit, drill approximately 1-5/8” deep to accept the lag stud (See Figure E). Using a 5/32” wrench, turn the lag stud until it is fully seated to the face of the post.
STABILIZER KITS (A0908 SERIES, S0950 SERIES)
More information is available in the Additional Components section found towards the end of these installation instructions. Refer to the Cable Stabilizer Kit installation instructions for detailed information on how to properly install cable stabilizers.
CABLE SLEEVE (C0915-0338 OR C0915-0338-F)
More information is available in the Additional Components section found towards the end of these installation instructions. Refer to the Cable Sleeve installation instructions for detailed information on how to properly install cable sleeves.

STRAIGHT SECTION- INSTALLING THE CABLE
The infill for the HandiSwage™ System is comprised of cable and a variety of fittings. The following section will show you how to install cable on straight sections.
HANDISWAGE™ STUDS (C0731 SERIES)
Measure & Run the Cable
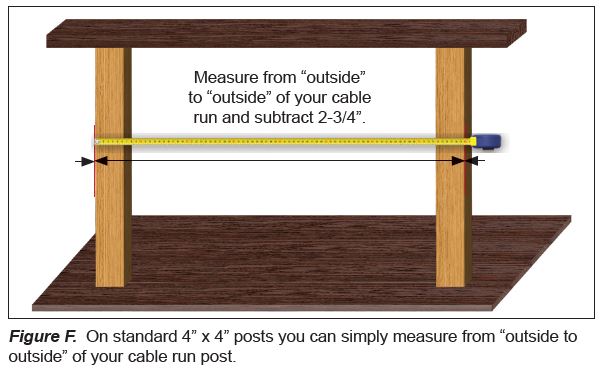
HandiSwage™ has the advantage of hidden tensioning as shown in Figures G through H. Since the tensioning threads are concealed by the post you can usually pre-cut all cables. On standard 4” x 4” posts, you can simply measure from “outside to outside” of your cable run post (See Figure F) and subtract 2-34″ to determine your proper cable length. This will leave approximately 1-5/8” tensioning thread at both ends. Make sure measurements are always from the outside of the post to outside of the opposite post. Beginning at the top, attach the cable to the swage terminal in accordance with the hand swaging tool instructions. It is important to follow the accompanied instructions.
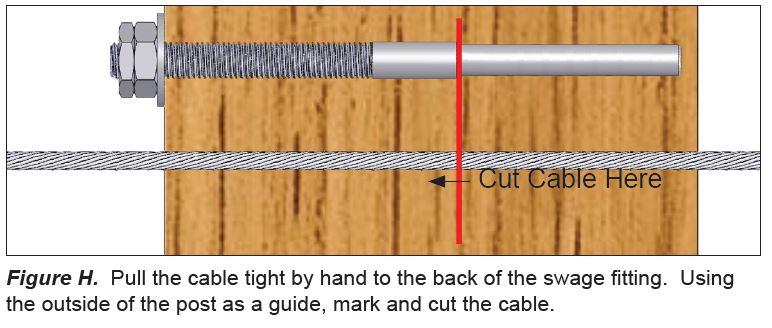
If you’re using the HandiSwage™ Cover Nut Set, place the washer, nut and lock nut on the end of the shank. Set aside the cover for tensioning later (See Figure G). On the other end of the cable run, place another swage fitting against the post. Thread the washer and nut onto the end. Leave the tensioning nut as much travel as possible. Pull the cable tight by hand to the back of the swage fitting. Mark and cut the cable (See Figure H).
Feed the cable through all the mid posts. Follow the swaging instructions again and swage the second fitting onto the cable. Re-attach the washer and nut. Repeat the above steps until all the cables are run before applying tension.
FLUSH FITTING (C0981-P003-2)
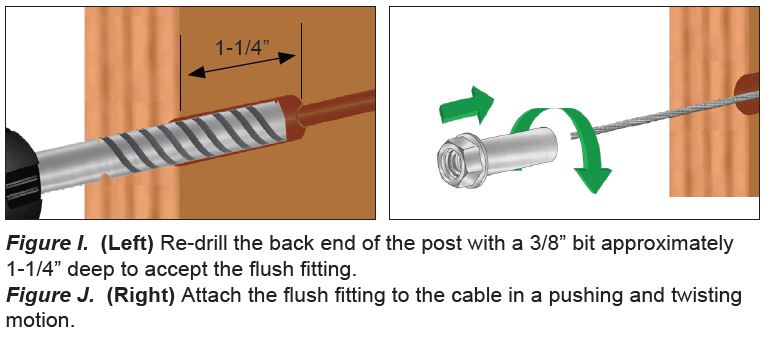
If using the HandiSwage™ Flush Fitting measure the entire span from outside to outside cable run posts and add 2 inches beyond the post at the opposite end and cut your cable to that length. Re-drill the back end of the post with a 3/8” bit approximately 1-1/4” deep to accept the flush fitting (See Figure I). Run your cable to the opposite post where you have drilled the post to accept the flush fitting, going through all mid posts. At the opposite end, put the cable through the end post and through the flush fitting. Attach the flush fitting to the cable in a pushing and twisting motion (See Figure J).
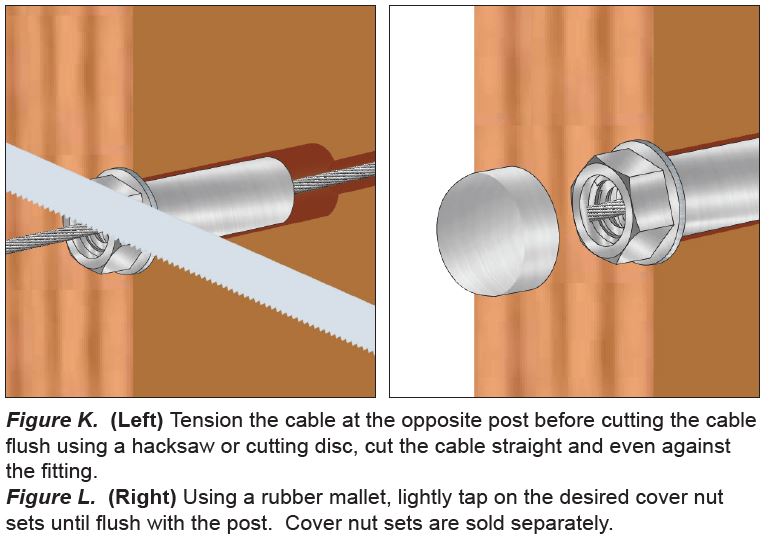
Tension the cable at the opposite post before cutting the cable flush using a hacksaw or cutting disc, cut the cable straight and even against the fitting (See Figure K). Using a rubber mallet, lightly tap on the desired cover nut sets until flush with the post. Cover nut sets are sold separately (See Figure L).
LAG STUD (S0747-HR03)
Crimp the cable in accordance with the swaging tool instructions. Pull the cable the length of its run and cut it a little long. You will need to cut it to length later. When the lag stud is installed (See Figure M), finish running the cable using the method prescribed above. The lag stud must have a tensioning device on the other end of the cable run.


STRAIGHT SECTION- TENSIONING THE CABLE
Make sure the posts are installed securely and in accordance with the manufacturers’ recommended installation procedures. Install all top and intermediate rails. The posts will deflect beyond allowable limits if you attempt to tension the cables on an incomplete guard frame. Before tensioning with tools, hold the stud fittings firm and tension the nuts of the system by hand until all cables are snug.
HANDISWAGE™ STUDS (C0731-H SERIES)
General Cable Tensioning
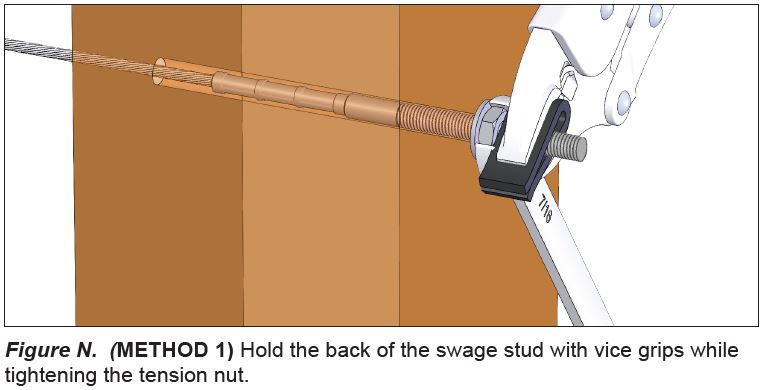
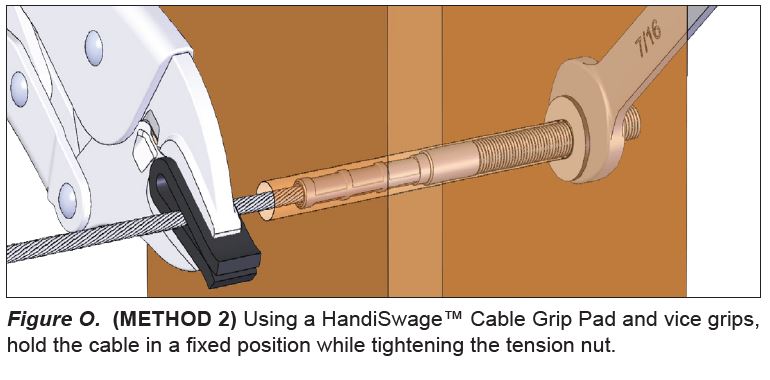
When tensioning cable using a HandiSwage™ stud, you must hold the stud or cable in a neutral position while turning the nut to apply tension. There are two methods to accomplish this; both requiring a pair of vice grip pliers.
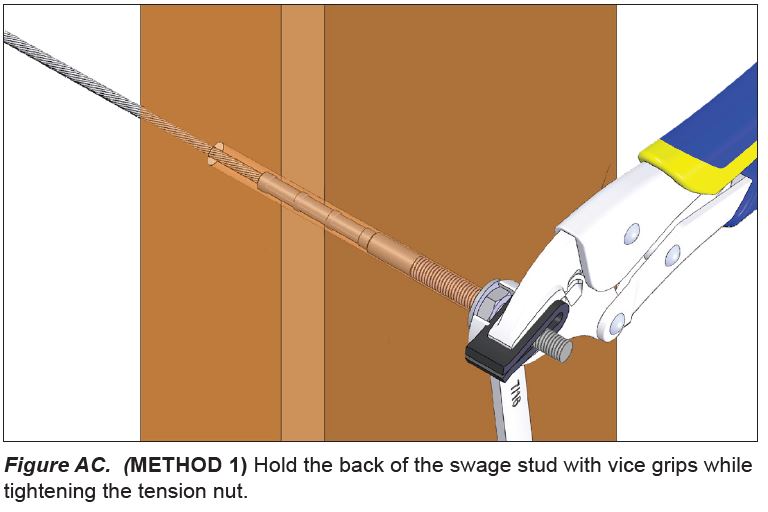
1) You can hold the back of the swage stud with the vice grips which requires at least 1/4” space between the tensioning nut and the end of the stud (See Figure N).
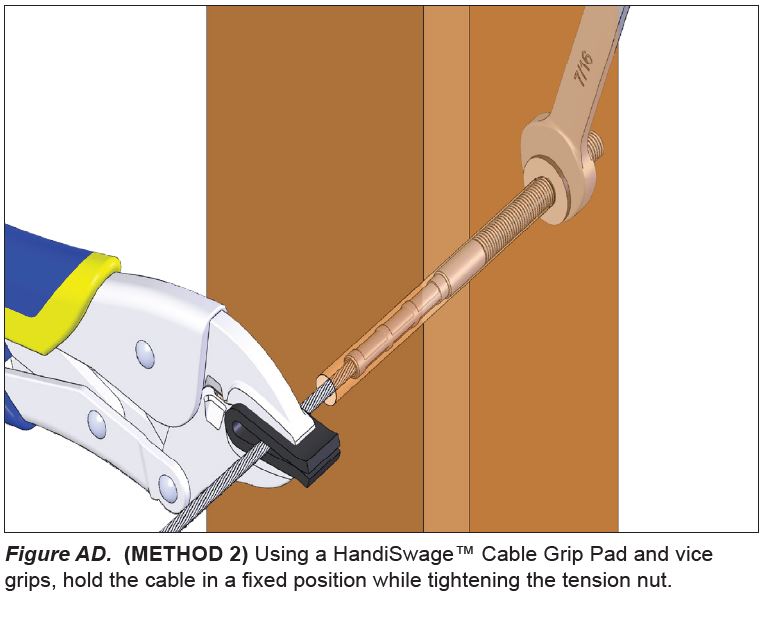
2) You can use a Cable Grip Pad to hold the cable just outside the post while you tension the stud using the tensioning nut (See Figure O).
Tensioning the Center Cable
Beginning with the center run of cable, hold the swage terminal firm using one of the methods described above and tighten the tensioning nut with a 7/16” wrench. Tighten the nut three or four full rotations until cable is snug. Don’t worry if this cable moves a little, we will come back around to it later.
Tensioning the Remaining Cables
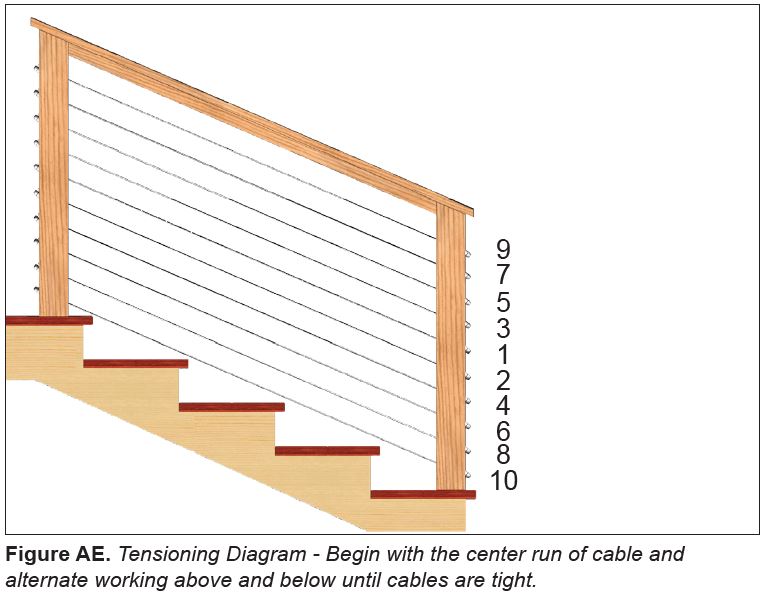
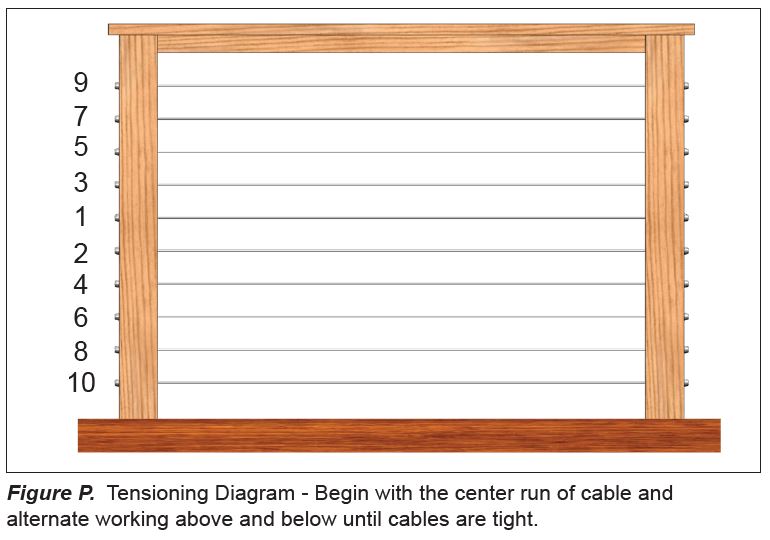
Alternate tensioning the cables from the center, working above and below the center cable as if tightening the lug nuts on a tire (See Figure P). Again, tension the nuts three or four full rotations or until cable is snug. You will notice as you tension, the cables surrounding it will slacken. When this happens, stop tensioning and move onto the next cable.
Make Final Adjustments
Go back to the center cable and re-tighten the cables until all are tight and relatively equal in tension. You may find that you need to do this three or four times getting down to even a quarter turn of the tensioning nut each time. Tension from both sides when necessary.
FLUSH FITTING (C0981-P003-2)
If using a flush fitting, the opposite end of the cable assembly requires a HandiSwage™ tensioning device. The Flush Fitting should be installed in the post and have cable installed in it. Follow the tensioning directions for HandiSwage™ studs to tension the other side of the Flush Fitting cable run.
LAG STUD (S0747-HR03)
If using a Lag Stud, the opposite end of the cable assembly requires a HandiSwage™ tensioning device. The Lag Stud should be installed in the post and have the cable installed in it. Follow the tensioning directions for HandiSwage™ studs to tension the other end of the Lag Stud cable run.
STRAIGHT SECTION- INSTALLING COVER NUTS
HandiSwage™ COVER NUT SETS (C0309 Series)
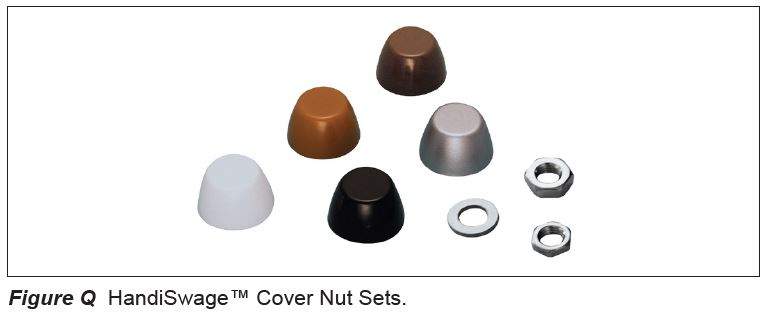
HandiSwage™ Cover Nut Sets (See Figure Q) are designed for use with HandiSwage™ Studs and are perfect for cable railing systems where “through-post” hardware is desired for minimal obstruction). Affix to end of swage stud for the finished look. The HandiSwage™ Cover Nut Sets comes with a stainless steel nut and washer in packs of 10 and are available in the following colors: white, light brown, dark brown, metallic silver and black.
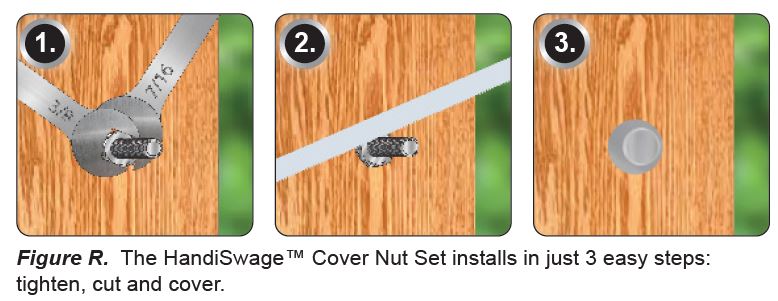
1) With the cables tensioned, it’s time to install the lock nuts and cover nuts. This is accomplished in just three easy steps, and you just did one of them! Using the HandiSwage™ Combination Wrench (part # C0731-TK01-2) hold in place the nut with the 7/16” end of the wrench and tighten the lock nut with the 3/8″ end of the wrench.
2) Using a hacksaw, cut the remaining shank off flush with the lock nut.
3) Place the cover nut over the assembly until it is flush with the post (See Figure R).
In addition to the HandiSwage™ Cover Nut Sets, Atlantis Rail offers an Acorn Nut Set (part # C0308-UF07-2) and Deluxe Cover Nut Set (part # C0307-U007-2). More information is available in the Additional Components section found towards the end of these installation instructions.
STAIR & RAMP SECTION- PREPARATION
Measure & Mark Your Posts
As in the previous section, begin by determining the number of cables you need to maintain code compliance.
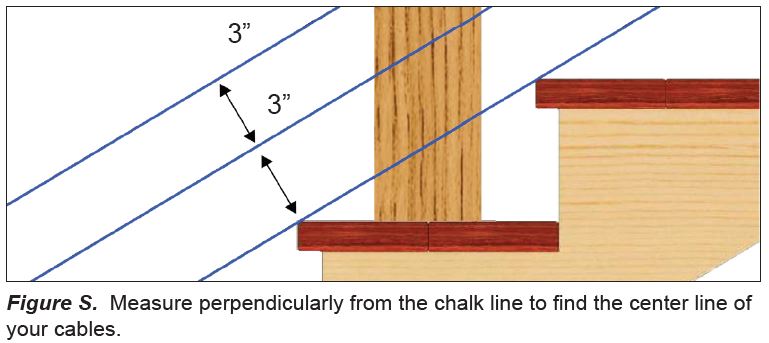
As before, find the center of your posts and draw a vertical line. Snap a chalk line parallel to the slope of the stairs at the height of your lowest cable run. Measure for your other cables 3” on center perpendicular to that line (See Figure S). Snap a chalk line for each cable run.
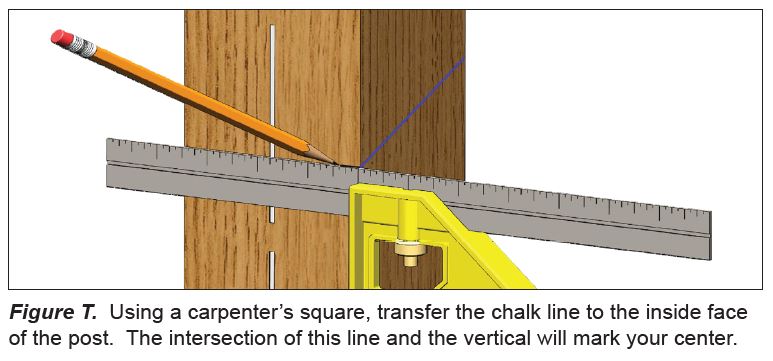
Using a carpenter’s square, transfer a line to the inside post face to find the center of your cable (See Figure T). Where this line intersects the vertical line is the center point for your cable.
Use Your Fittings as a Guide
On the end posts, place the center of your fittings on the marks made in the previous section. Carefully mark and pre-drill the centers of the fasteners using a 1/8” drill bit.
The HandiSwage™ Tensioner base uses three (3) #8 screws. When installing tensioners on stairs, make sure the notch is facing vertical allowing the 45° of motion up or down. As an additional component, we offer a drilling template that has hole patterns laid out for ease of use. See below for more information.
HANDISWAGE™ STUDS (C0731 SERIES)
A HandiSwage™ Stud or Long Stud can be used in place of the tensioner (part # C0731-H0703-2 or C0731-HL03-2).
Drill the Mid Posts
Find your hole locations using the method described above. Carefully drill the mid posts using a 3/16” drill bit. Use a spotter on the side to make sure that the drill is angled properly. It is important to drill the angle correctly to prevent the cable from bending or kinking. There are several drill guide tools commercially available to help you with this task.
34 Degree Stair Spacer – C0841-0034-2
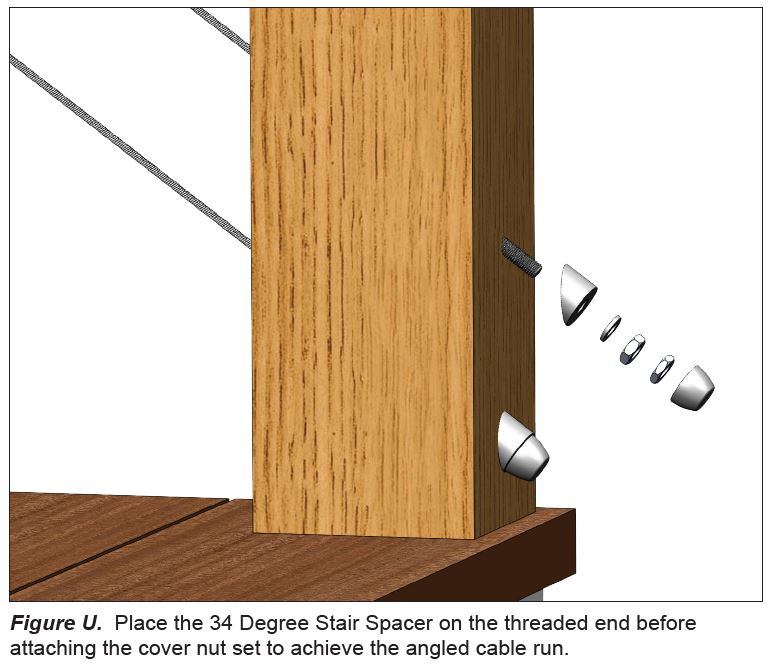
When installing cable infill on stair posts, a 34° Stair Spacer (part # C0841-0034-2) is used to achieve the angled cable run. Place the stair spacer on the threaded end of the stud before attaching the desired cover nut set (See Figure U).
Using a HandiSwage™ Stud (part # C0731-H0703 -2) or a HandiSwage™ Long Stud (part # C0731-HL703 -2) on a stair rail paired with stair spacers allows the use of a desired cover nut set.
HANDISWAGE™ TENSIONER (C078-0003-2)
Drill the Stair Posts
Use the HandiSwage™ Tensioner (part # C0748-0003-2) for attaching runs of cable to the NOVA II stair sections.
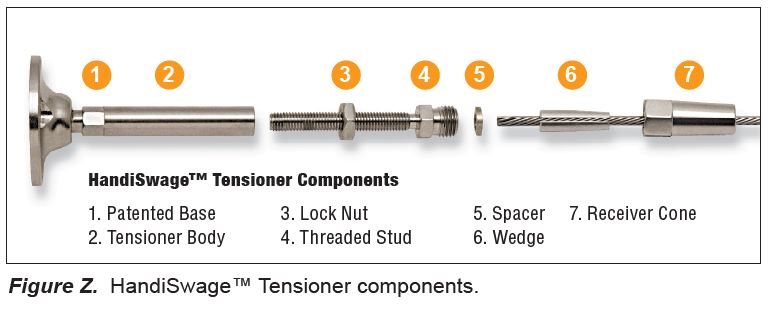
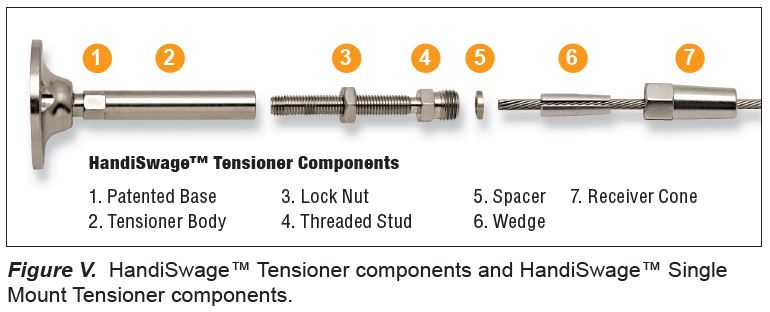
The HandiSwage™ Tensioner is comprised of a number of components to keep your cable railing system properly tensioned (See Figure V).
Use only 1/8” stainless steel cable with the HandiSwage™ tensioner.
Pre-drill the holes on the top and bottom stair posts using a 9/64” drill bit. Fasten the HandiSwage™ Tensioners using three (3) #8 x 1-1/2” screws (supplied).
STAIR & RAMP SECTION- INSTALLING THE CABLE
HANDISWAGE™ TENSIONER (C078-0003-2)
Measure & Run the Cable
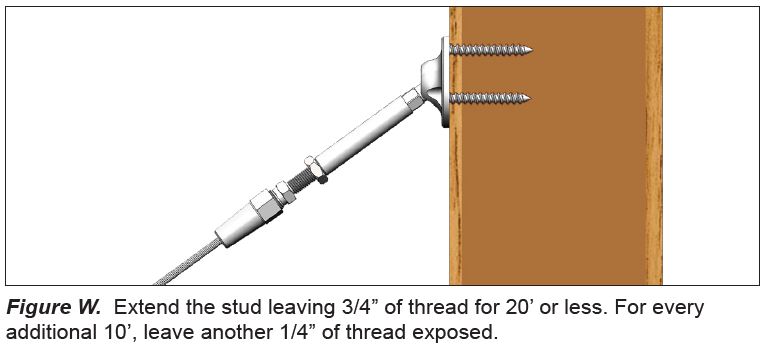
1) Extend Threaded Stud 3/4” for a section of 20 feet or less and extend an additional 1/4” for every 10 feet thereafter (See Figure W). Maximum recommended cable span is 48’.
2) Insert cable into Receiver Cone, Wedge and Spacer until it is fully seated in the Threaded Stud.
3) Thread Cone Assembly onto the Threaded Stud using 7/16” and 3/8” open wrenches. Tighten until threads are no longer visible (if possible) and Receiver Cone is tight.
The infill for the HandiSwage™ System is comprised of cable and a variety of fittings. The following section will show you how to install cable on stair sections.
HANDISWAGE™ STUDS (C0731 SERIES)
Measure & Run the Cable
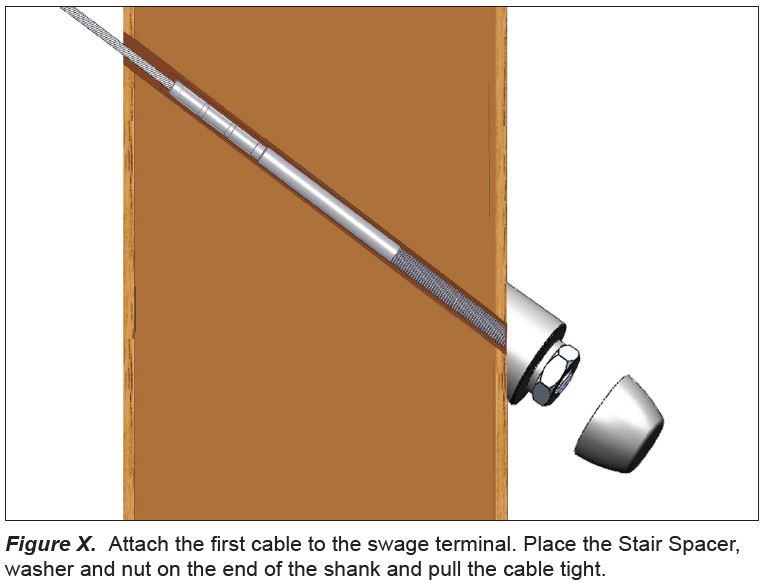
HandiSwage™ has the advantage of hidden tensioning as shown in Figures X and Y. Since the tensioning threads are concealed by the post you should leave approximately 1-5/8” tensioning thread at both ends. Beginning at the top, attach the cable to the swage terminal in accordance with the hand swaging tool instructions. It is important to follow the accompanied instructions.
If you’re using the HandiSwage™ Cover Nut Set, place the Stair Spacer, washer and nut on the end of the shank. Set aside he cover for tensioning later (See Figure X). On the other end of the cable run, place another swage fitting against the post. Pull the cable tight by hand to the back of the swage fitting. Mark and cut the cable.
Feed the cable through all the mid posts. Follow the swaging instructions again and swage the second fitting onto the cable.
Re-attach the washer and nut. Repeat the above steps until all the cables are run before applying tension.
34 DEGREE STAIR SPACER (C0841-0034-2)
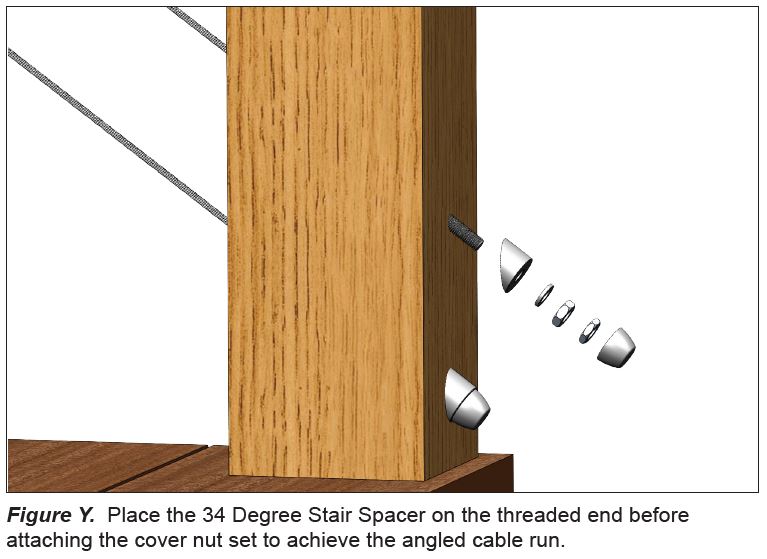
When installing cable infill on stair posts, a 34° Stair Spacer (part # C0841-0034-2) is used to achieve the angled cable run. Place the stair spacer on the threaded end of the stud before attaching the desired cover nut set (See Figure Y).
Using a HandiSwage™ Stud (part # C0731-H0703 -2) or a HandiSwage™ Long Stud (part # C0731-HL703 -2) on a stair rail paired with stair spacers allows the use of a desired cover nut set.
STAIR & RAMP SECTION- TENSIONING THE CABLE
Before tensioning any of the cables, it is important to be sure that the frame for the infill is completed. Make sure the posts are installed securely and in accordance with the manufacturers’ recommended installation procedures. Install all top and intermediate rails. The posts will deflect beyond allowable limits if you attempt to tension the cables on an incomplete guard frame.
HANDISWAGE™ TENSIONER (C0748-0003-2) (SEE FIGURE Z)
Tension the Center Cable
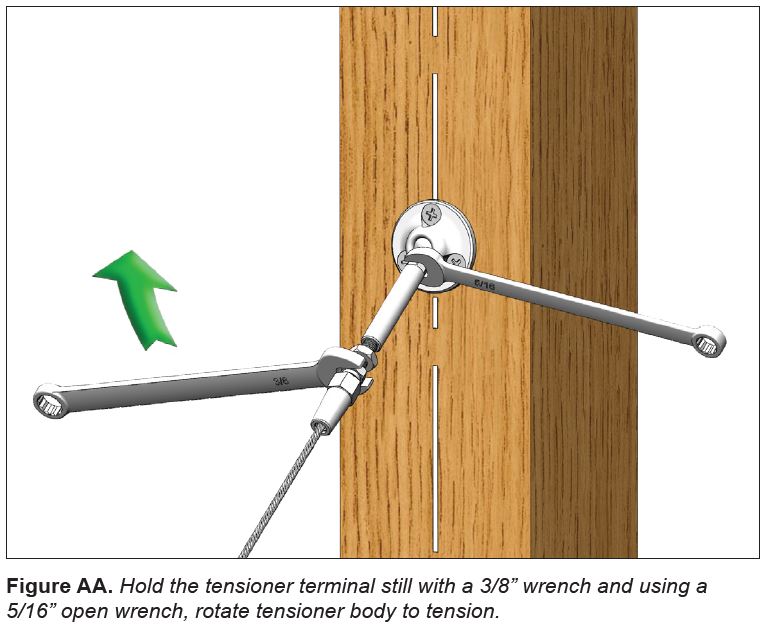
Before tensioning with tools, hold the stud fitting firm and rotate the tensioner body by hand until all cables are snug. Beginning with the center run of cable, hold the swage terminal firm using a 3/16” wrench. Using a 5/16” open wrench, rotate the tensioner body to tension the cable (See Figure AA). Turn the body three or four full rotations until cable is snug. Don’t worry if this cable moves a little, we will come back around to it later.
Hold hex flats on Threaded Stud with a wrench. Place a wrench on hex flats of Tensioner Body and rotate Tensioner Body as needed. Tension cable equally from both ends of each cable span. Tighten Lock Nut to secure tension. Add “Non-Acidic” Silicone Sealant to open tip of Receiver Cone in harsh environments. For additional instructions refer to the RailEasy Tensioner installation instructions.
Tension the Remaining Cables
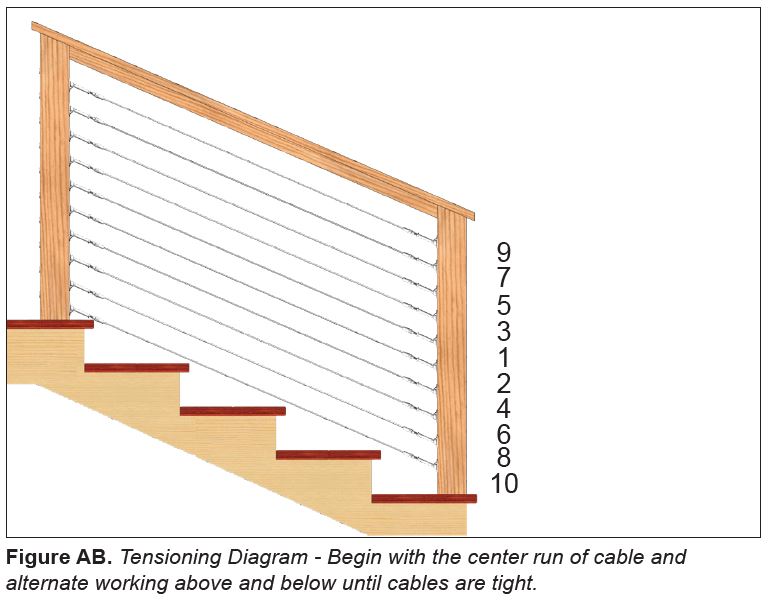
Alternate tensioning the cables from center, working above and below the center cable as if tightening the lug nuts on a tire (See Figure AB). Rotate the body three or four full rotations or until cable is snug. You will notice as you tension, the cables surrounding it will slacken. When this begins happening, stop tensioning and move onto the next cable.
Make Final Adjustments
Go back to the center cable and re-tighten the cables until all are tight and relatively equal in tension. You may find that you need to do this three or four times getting down to even a quarter turn of the tensioner body each time. Tension from both sides when necessary.
HANDISWAGE™ STUDS (C0731 SERIES)
General Cable Tensioning
When tensioning cable using a stud of any type, you must hold the stud or cable in a neutral position while turning the nut to apply tension. There are two methods to accomplish this; both requiring a pair of vice grip pliers.
1) You can hold the back of the swage stud with the vice grips which requires at least 1/4” space between the tensioning nut and the end of the stud (See Figure AC).
2) You can use a Cable Grip Pad to hold the cable just out side the post while you tension the stud using the tensioning nut (See Figure AD).
Tension the Center Cable
Beginning with the center run of cable, hold the swage terminal firm using one of the methods described above and tighten the tensioning nut with a 7/16” wrench. Tighten the nut three or four full rotations until cable is snug. Don’t worry if this cable moves a little, we will come back around to it later.
Tension the Remaining Cables
Alternate tensioning the cables from the center, working above and below the center cable as if tightening the lug nuts on a tire (See Figure AE). Again tension the nuts three or four full rotations or until cable is snug. You will notice as you tension, the cables surrounding it will slacken. When this happens, stop tensioning and move onto the next cable.
Make Final Adjustments
Go back to the center cable and re-tighten the cables until all are tight and relatively equal in tension. You may find that you need to do this three or four times getting down to even a quarter turn of the tensioning nut each time. Tension from both sides when necessary.
STAIR & RAMP SECTION- INSTALLING COVER NUT SETS
HANDISWAGE™ COVER NUT SET (C0309 SERIES)
Refer to the “Straight Section – Installing Cover Nut Sets” portion above. More information is available in the Additional Components section found in the above section of these installation instructions.
HANDISWAGE™ CABLE RAILING SYSTEM SPECIFICATIONS
The HandiSwage™ cable infill utilizes HandiSwage™ fittings with 1/8” cable. It is advised to observe that tension must be applied to fittings and cable. Posts should be mounted securely enough to resist detachment and hold under tension.
Straight Sections
Atlantis Rail offers standard rail heights of 36” or 42” for straight sections.
Stair Sections
Rail height for stair sections is available in 36” only.
Between Post Lengths
Atlantis Rail recommends staying within 4’ section lengths to maintain structural integrity. If section lengths exceed 4’, we offer a Cable Stabilizer Kit to minimize cable deflection.
Cable Spacing
The cable is spaced on posts at 3” on-center to comply with nationwide building codes.
We do not supply the guard frame for the HandiSwage™ Cable Railing System. Guard frame should be capable of receiving the mounting screws and withstanding deflection under tension. All components in the HandiSwage™ System are made of grade 316L stainless steel. Working load limit for all hand swage terminals is 60-70% of cable strength.
COMPONENTS
